KeycloakでSpring Bootアプリケーションを簡単にセキュアにする
2017年5月29日 Sébastien Blanc 著
この投稿は1年以上前のものです。ブログ記事の内容は古くなっている可能性があります。
Keycloakとは?
セキュリティはあらゆるアプリケーションにおいて重要な側面ですが、その実装は難しい場合があります。さらに悪いことに、セキュリティはしばしば無視され、不十分に実装され、コードに侵入的です。しかし最近、認証と認可の側面をすべて外部委託および委任できるセキュリティサーバーが登場しました。これらのサーバーの中で最も有望なものの1つがKeycloakです。Keycloakは、オープンソースで柔軟性があり、テクノロジーに依存せず、独自のインフラストラクチャに簡単にデプロイ/適応できます。さらに、Keycloakは単なる認証サーバーではなく、完全なID管理システム、LDAPのようなサードパーティ向けのユーザーフェデレーションなども提供しています... 詳細については、こちらをご覧ください。プロジェクトはGithubでも見つけることができますSpring BootとKeycloak
Keycloakは、Keycloakインスタンスと対話する必要があるアプリケーション用のアダプターを提供します。WildFly/EAP、NodeJS、Javascript、そしてもちろんSpring Boot用のアダプターがあります。Keycloakサーバーのセットアップ
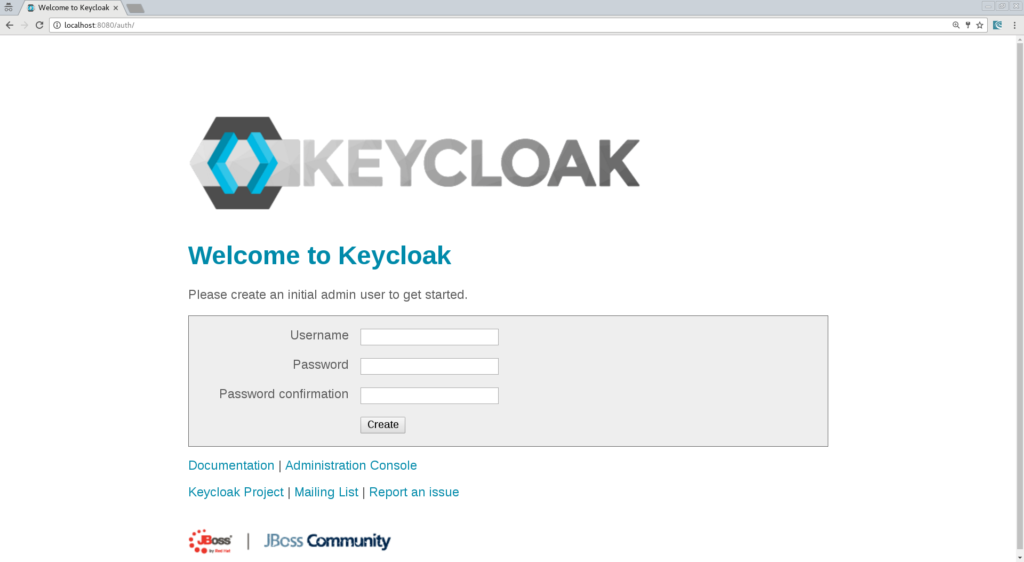
./standalone.sh(bat)次に、ブラウザを開いてhttps://:8080/authにアクセスします。サーバーを初めて実行するため、管理者ユーザーを作成する必要があります。ユーザー名に「admin」、パスワードに「admin」として管理者ユーザーを作成しましょう。
これで、管理コンソールにログインしてKeycloakの設定を開始できます。
新しいレルムの作成
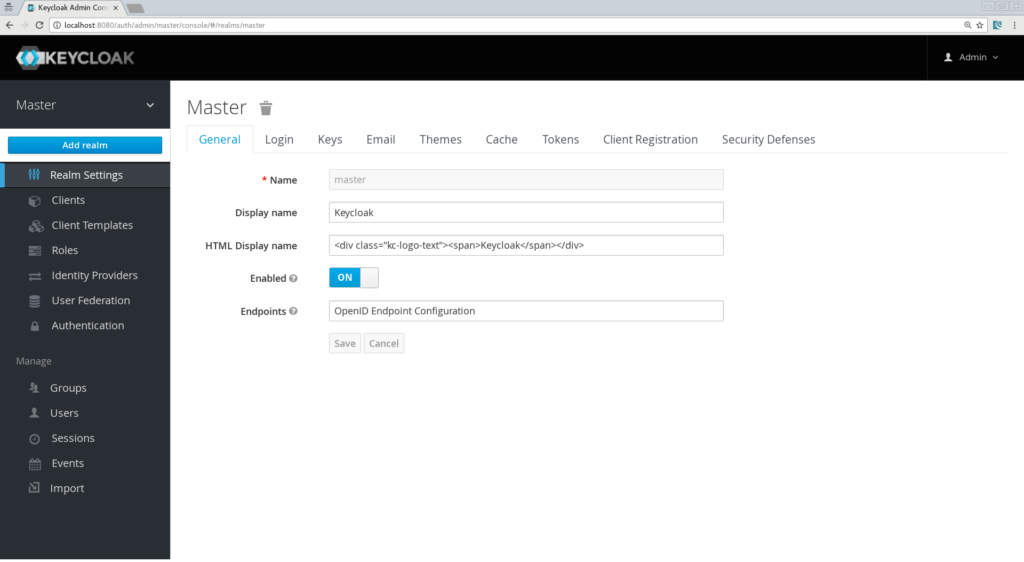
「SpringBoot」と名付けましょう。
クライアント、ロール、およびユーザーの作成
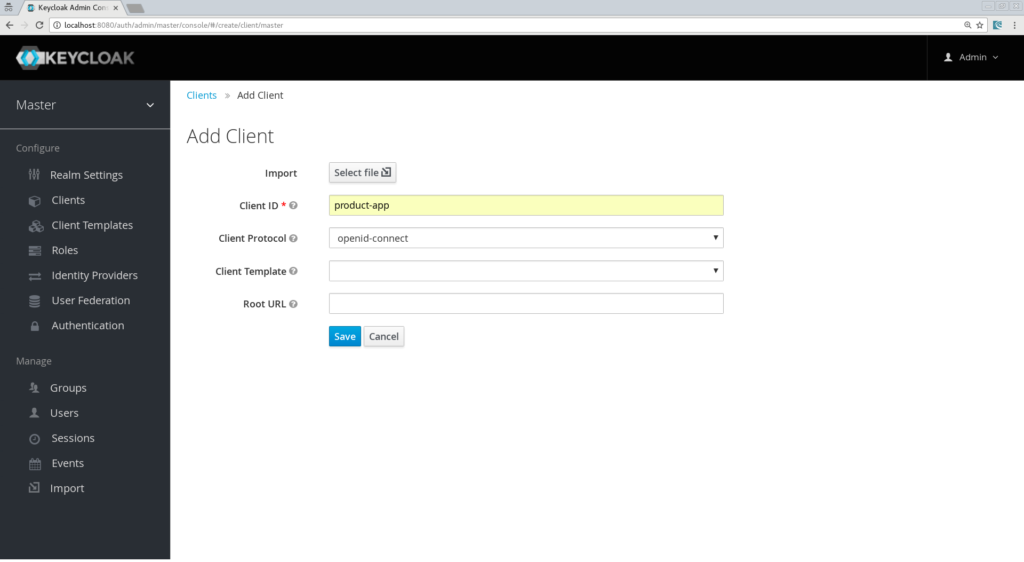
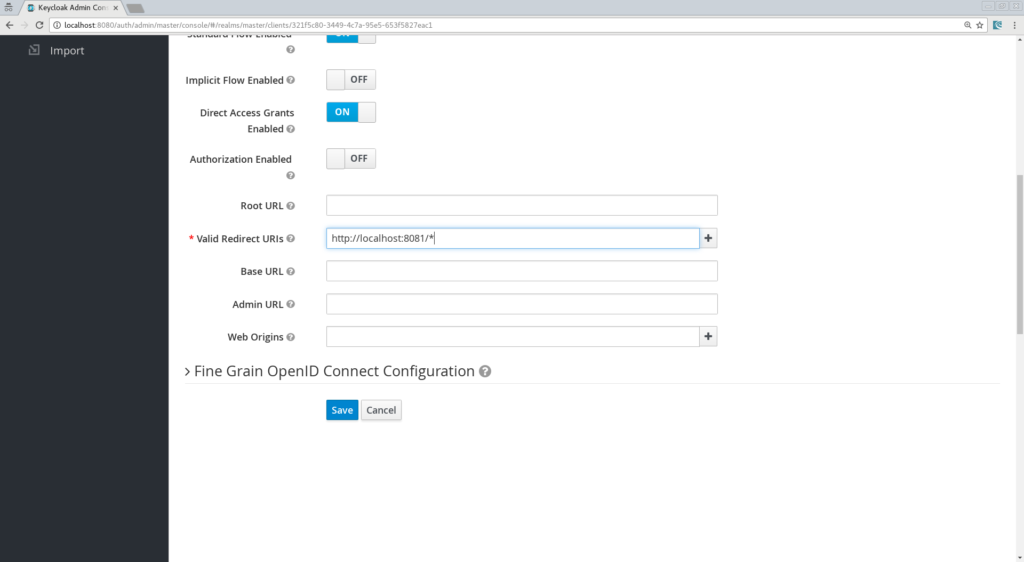
次の画面では、デフォルト設定を維持できますが、ユーザーが認証された後にKeycloakが使用する有効なリダイレクトURLを入力する必要があります。値として「https://:8081/*」を入力します。
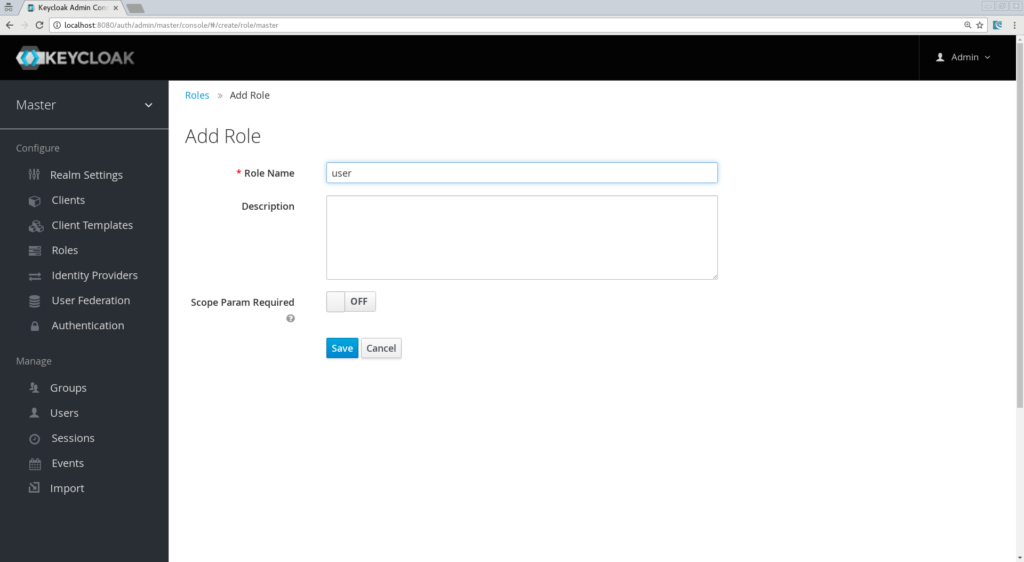
「保存」を忘れないでください!次に、ユーザーに割り当てるロールを定義します。「user」というシンプルなロールを作成しましょう。
そして最後に、ユーザーを作成しましょう。必要なのはユーザー名プロパティのみです。「testuser」と名付けましょう。

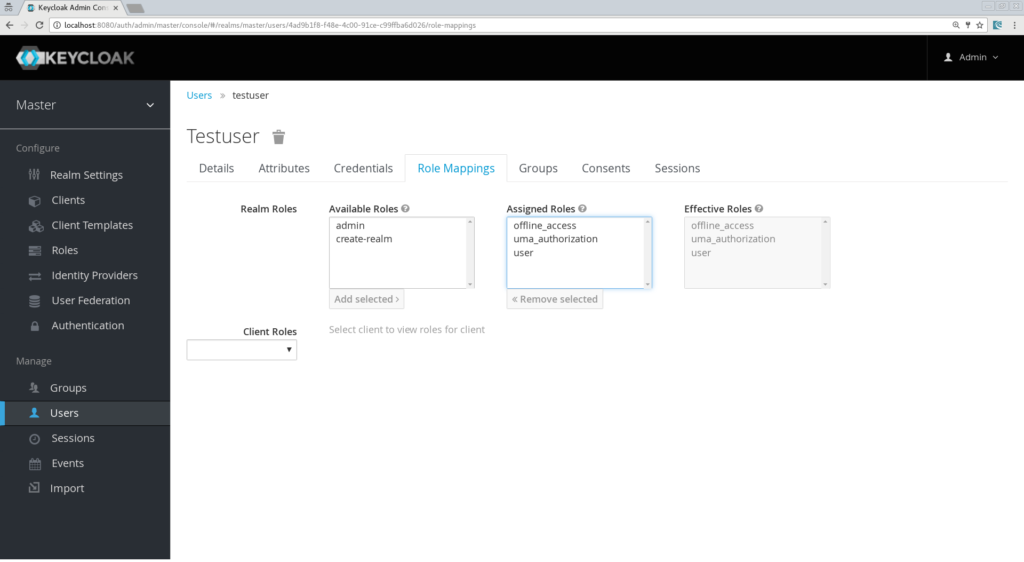
そして最後に、彼の資格情報を設定する必要があります。ユーザーの資格情報タブに移動し、パスワードを選択します。この記事の残りの部分では「password」を使用します。「一時的」フラグをオフにしてください。そうしないと、ユーザーが最初に認証するときにパスワードを変更する必要があります。「ロールマッピング」タブに進み、「user」ロールを割り当てます。
これでKeycloakサーバーの設定は完了です。Spring Bootアプリの構築を開始できます!
簡単なアプリの作成
- Web
- Freemarker
- Keycloak
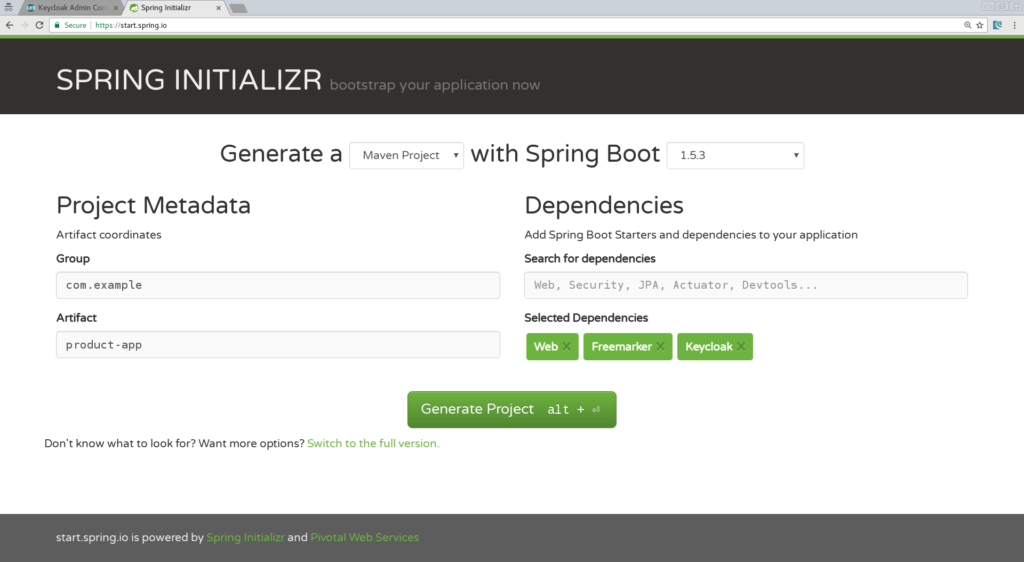
お気に入りのIDEにアプリケーションをインポートします。ここではIntelliJを使用します。アプリはシンプルで、2ページのみが含まれます。
- index.html:製品ページへのリンクのみを含むランディングページになります。
- Products.ftl:製品ページのテンプレートになり、認証されたユーザーのみがアクセスできます。
<html>
<head>
    <title>My awesome landing page</title>
</head>
 <body>
   <h2>Landing page</h2>
   <a href="/products">My products</a>
 </body>
</html>
次に、コントローラーが必要です。@Controller
class ProductController {
@Autowired ProductService productService;
@GetMapping(path = "/products")
public String getProducts(Model model){
model.addAttribute("products", productService.getProducts());
return "products";
}
@GetMapping(path = "/logout")
public String logout(HttpServletRequest request) throws ServletException {
request.logout();
return "/";
}
}
ご覧のとおり、簡単です。製品ページのマッピングとログアウトアクションのマッピングを定義します。また、「ProductService」を呼び出していることにも気付くでしょう。これは、Spring MVC Modelオブジェクトに入れる文字列のリストを返すため、そのサービスを作成しましょう。@Component
class ProductService {
public List<String> getProducts() {
return Arrays.asList("iPad","iPod","iPhone");
}
}
また、product.ftlテンプレートを作成する必要があります。「src/resources/templates」にこのファイルを作成します。<#import "/spring.ftl" as spring>
<html>
<h2>My products</h2>
<ul>
<#list products as product>
<li>$amp{product}</li>
</#list>
</ul>
<p>
<a href="/logout">Logout</a>
</p>
</html>
ここでは、Spring MVC Modelオブジェクトにある製品のリストを反復処理し、アプリケーションからログアウトするためのリンクを追加します。残っているのは、application.propertiesにいくつかのkeycloakプロパティを追加することだけです。Keycloakの構成の定義
keycloak.auth-server-url=https://:8080/auth
keycloak.realm=springboot
keycloak.public-client=true
keycloak.resource=product-app
次に、Java EEアプリでweb.xmlで行うように、いくつかのセキュリティ制約を定義する必要があります。
keycloak.security-constraints[0].authRoles[0]=user
keycloak.security-constraints[0].securityCollections[0].patterns[0]=/products/*
ここでは、/products/*へのすべてのリクエストは認証されたユーザーによって行われる必要があり、そのユーザーは「user」ロールを持っている必要があると定義します。最後のプロパティは、アプリケーションがポート8081で実行されるようにすることです。
server.port=8081これで準備完了です。アプリを実行できます!Spring Bootアプリケーションを実行するにはいくつかのオプションがありますが、Mavenを使用すると、簡単に実行できます。
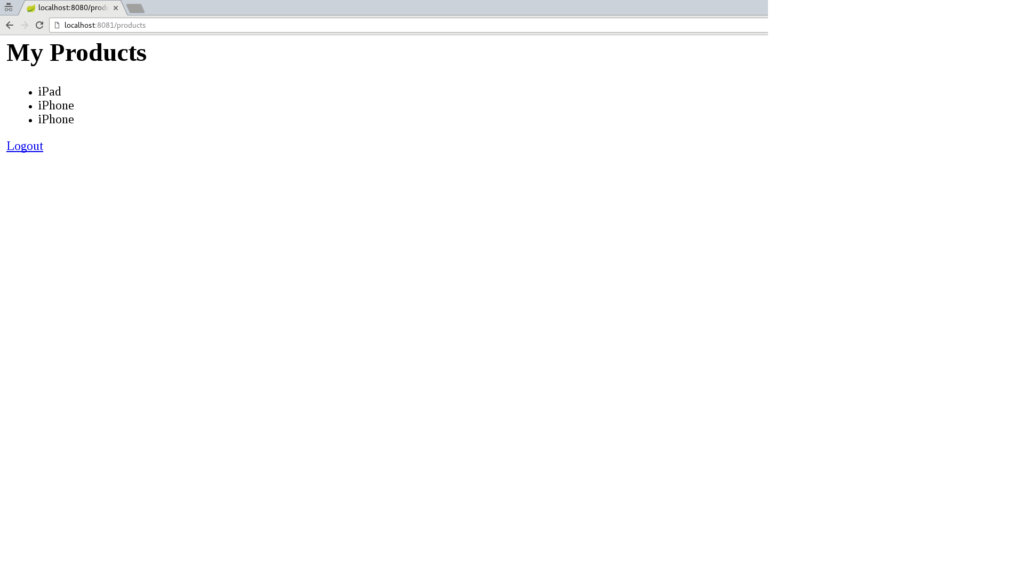
mvn clean spring-boot:run「https://:8080」を参照すると、ランディングページが表示されます。「products」リンクをクリックすると、Keycloakログインページにリダイレクトされます。
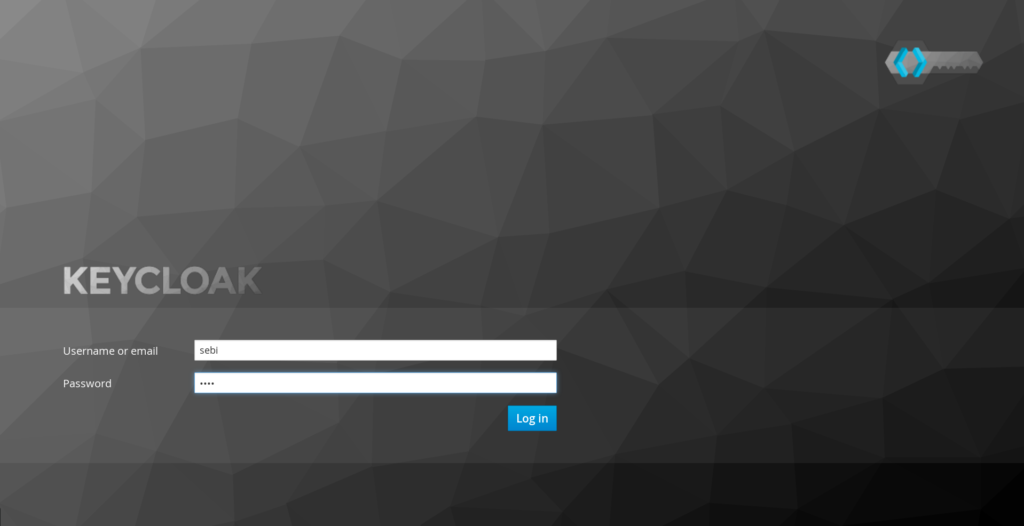
ユーザー「testuser/password」でログインすると、製品ページにリダイレクトされます。
おめでとうございます!Keycloakで最初のSpring Bootアプリを保護しました。ログアウトしてKeycloak管理コンソールに戻り、ログインページをどのように「調整」できるかを確認してください。たとえば、「Remember Me」や「User Registration」を有効にして、[保存]ボタンをクリックしてログイン画面に戻ると、これらの機能が追加されていることがわかります。
Spring Securityのサポートの導入
Spring Security Starterの追加
<dependency>
   <groupId>org.springframework.boot</groupId>
   <artifactId>spring-boot-starter-security</artifactId>
</dependency>
SecurityConfigクラスの作成
@Configuration
@EnableWebSecurity
@ComponentScan(basePackageClasses = KeycloakSecurityComponents.class)
 class SecurityConfig extends KeycloakWebSecurityConfigurerAdapter
{
   /**
    * Registers the KeycloakAuthenticationProvider with the authentication manager.
    */
   @Autowired
   public void configureGlobal(AuthenticationManagerBuilder auth) throws Exception {
      KeycloakAuthenticationProvider keycloakAuthenticationProvider = keycloakAuthenticationProvider();
      keycloakAuthenticationProvider.setGrantedAuthoritiesMapper(new SimpleAuthorityMapper());
      auth.authenticationProvider(keycloakAuthenticationProvider);
   }

   @Bean
   public KeycloakConfigResolver KeycloakConfigResolver() {
      return new KeycloakSpringBootConfigResolver();
   }

   /**
    * Defines the session authentication strategy.
    */
   @Bean
   @Override
   protected SessionAuthenticationStrategy sessionAuthenticationStrategy() {
      return new RegisterSessionAuthenticationStrategy(new SessionRegistryImpl());
   }

   @Override
   protected void configure(HttpSecurity http) throws Exception
   {
      super.configure(http);
      http
            .authorizeRequests()
            .antMatchers("/products*").hasRole("user")
            .anyRequest().permitAll();
   }
}
最も重要なメソッドを詳しく見てみましょう。- configureGlobal:ここでは、Granted Authority Mapperを変更します。デフォルトではSpring Securityでは、ロールにはROLE_がプレフィックスとして付加されます。レルム構成でこれを変更することもできますが、この規則を知らない他のアプリケーションにとっては混乱を招く可能性があるため、ここではプレフィックスが追加されないようにするSimpleAuthorityMapperを割り当てます。
- keycloakConfigResolver:デフォルトでは、Keycloak Spring Securityアダプターは、クラスパスにあるkeycloak.jsonという名前のファイルを検索します。しかし、ここではSpring Bootプロパティファイルのサポートを活用したいと考えています。
- configure:ここでは、セキュリティ制約を定義します。理解するのは非常に簡単で、「/products」パスを「user」ロールで保護します。
keycloak.principal-attribute=preferred_usernameこれで、プリンシパルをコントローラーメソッドに注入し、ユーザー名をSpring MVCモデルに入れることもできます。
@GetMapping(path = "/products")
public String getProducts(Principal principal, Model model){
   model.addAttribute("principal",principal);
   model.addAttribute("products", productService.getProducts());
   return "products";
}
最後に、ユーザー名を出力するようにproduct.ftlテンプレートを更新します。<#import "/spring.ftl" as spring>
<html>
<h2>Hello $amp{principal.getName()}</h2>
<ul>
<#list products as product>
<li>$amp{product}</li>
</#list>
</ul>
<p>
<a href="/logout">Logout</a>
</p>
</html>
アプリを再起動し、再度認証すると、引き続き機能し、製品ページにユーザー名が表示されるはずです。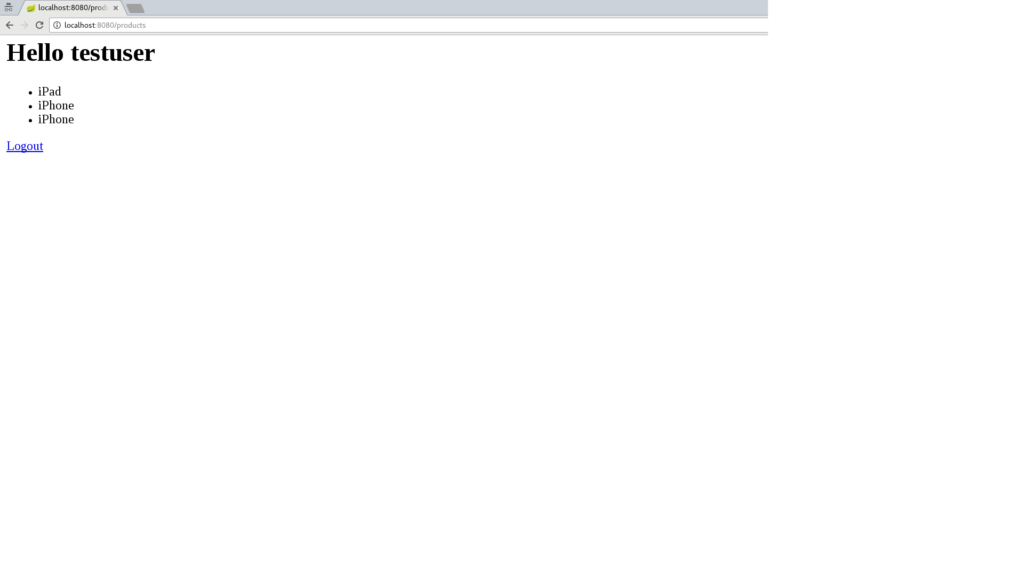
結論
- マイクロサービスを保護する方法を確認する。
- マイクロサービスが安全に「対話」する方法。
- AngularJSで構築されたPure Web AppをKeycloakで保護し、保護されたマイクロサービスを呼び出す方法。
スクリーンキャスト
この記事は「スクリーンキャスト」形式でも利用できます。- https://www.youtube.com/watch?v=UUWyu1kG6YI (パート1)
- https://www.youtube.com/watch?v=Yc5Qe5C3Xn4 (パート2)
リソース
- Githubプロジェクト
- Keycloakウェブサイト
- Spring Boot Keycloakアダプタードキュメント
- Spring Security Keycloakアダプタードキュメント
- Spring Initializrサイト